How to integrate Power Automate, Power BI, and Copilot Studio in an alert workflow
Too lazy to read? ChatGPT them
Let's start
When I started building this integration between Power Automate and Microsoft Copilot, I felt there was a gap for something more direct. The concept sounds simple: collect data, send the context to an agent, and return the answer. This post brings together what I learned along the way, including the small implementation details that usually get skipped.
Before you begin, open your corporate account in the Microsoft Portal and confirm that you have a Copilot license, as shown below:
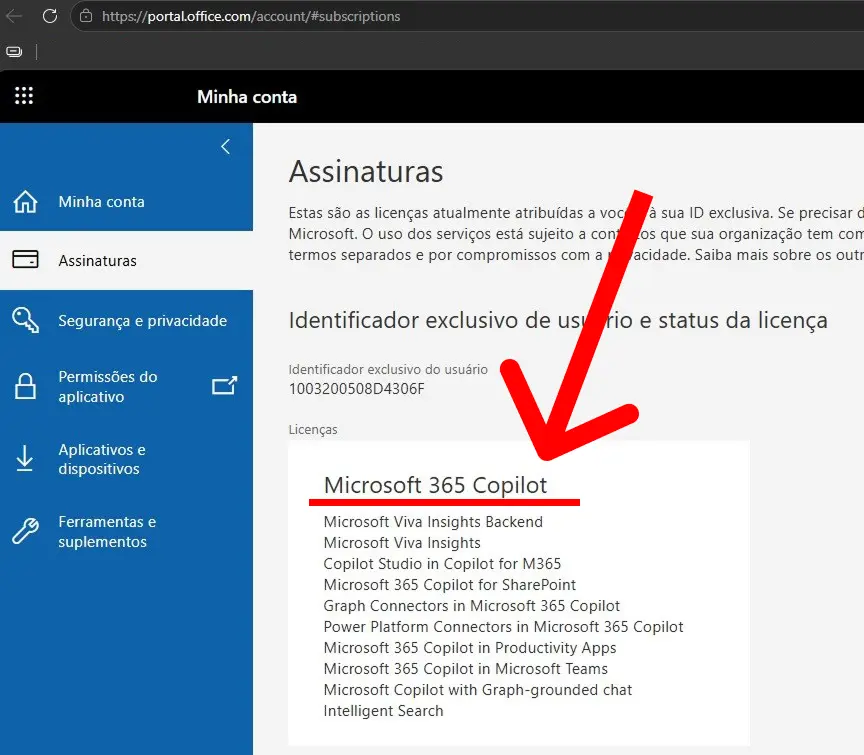
If you do, you can move forward. If not, the workflow will stop before the agent step even begins.
Creating an agent in Copilot Studio
Once the license is confirmed, the next step is to create the agent that will interpret the data sent by Power Automate. Open Copilot Studio and follow the creation flow. The initial setup takes less than a minute.
1. Agent name
Choose a name that clearly reflects the agent's role in your workflow. In this example, I used Rubens.
2. Instructions
This is the most important field in the setup. It defines the agent's role, tone, and analysis boundaries. In my case, I instructed Rubens to act as a Supply Chain specialist, focused on identifying alerts and deviations related to Spend and Average Payment Term. I hid part of the configuration for security reasons, but this is where good guidance matters most.
3. Language model
Select the model the agent will use. In this workflow, I am using GPT-5 Chat, which offers a 128K token context window.
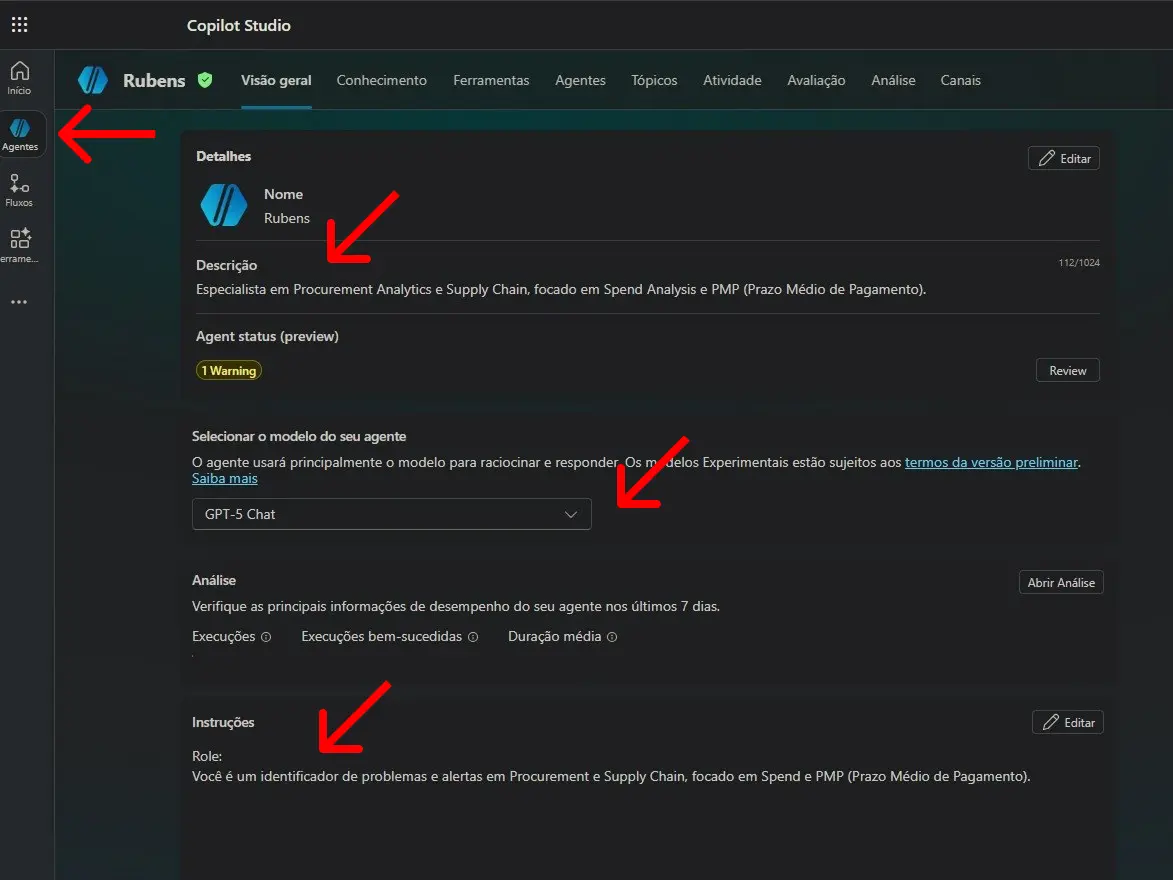
Notice that the Overview > Instructions screen concentrates everything the agent needs to know before receiving any data. The more objective and specific you are in this field, the more consistent the final response will be.
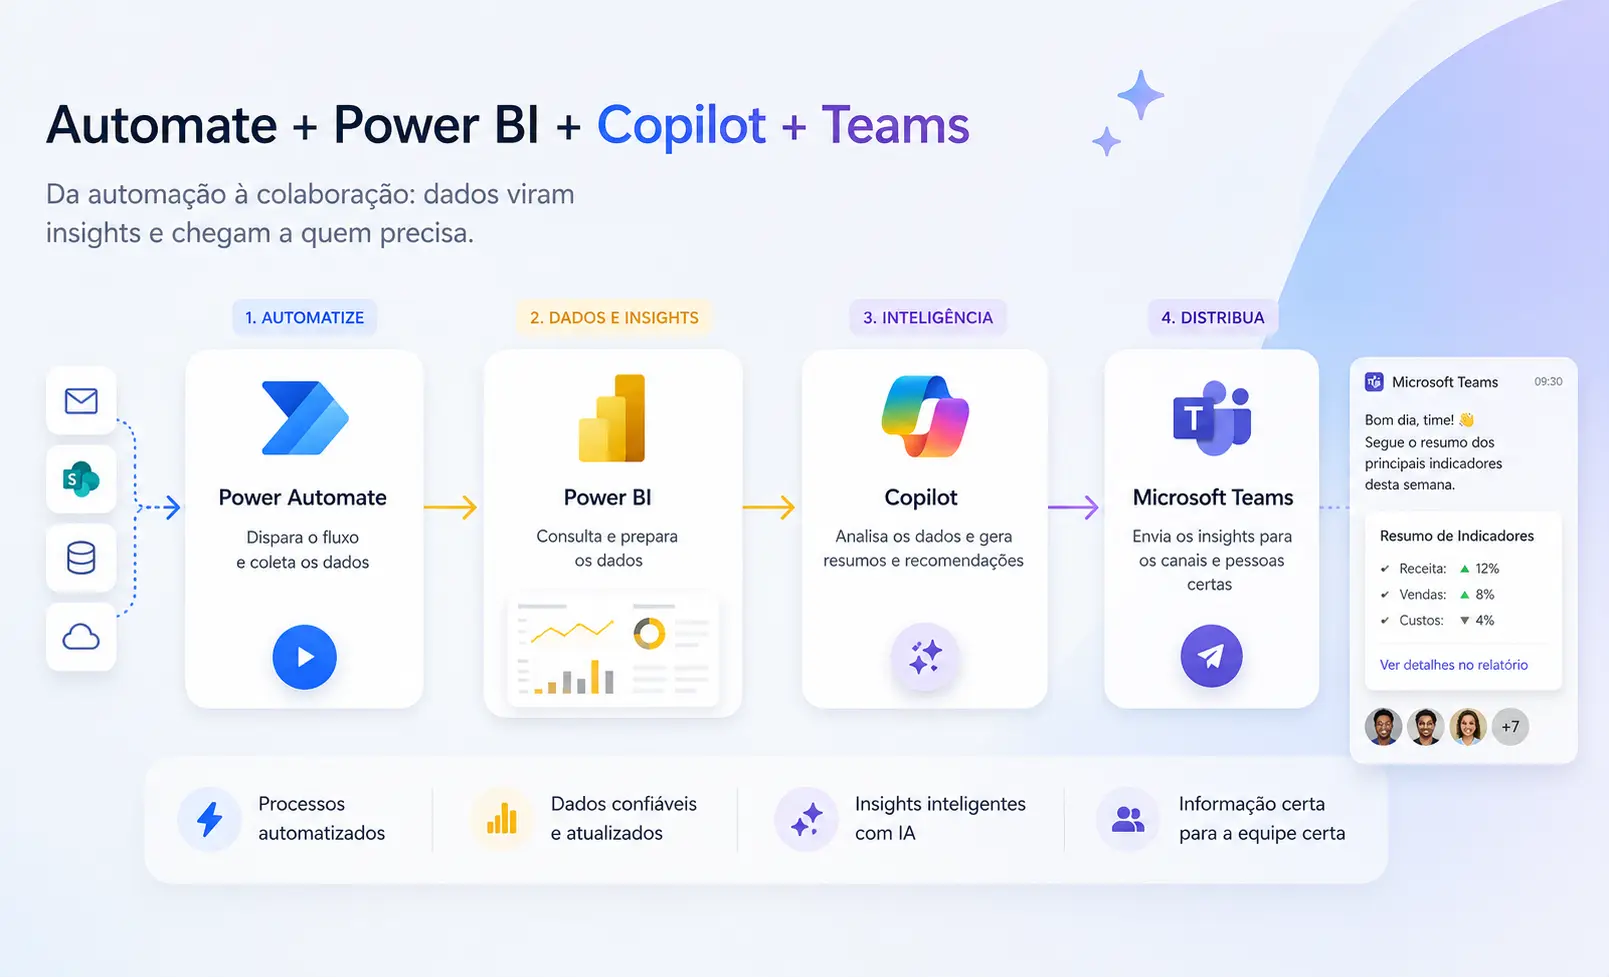
The idea behind the workflow
In this project, I use Power Automate as the orchestrator to connect a data source in Power BI, send the context to an AI agent in Copilot Studio, and deliver the formatted result in Teams. Everything happens inside the Microsoft ecosystem.
This workflow was designed to support a Supply Chain routine, specifically the monitoring of spend and average payment term. The goal was to identify alerts and deviations and notify managers without relying only on manual dashboard checks. In other words, besides the dashboards already used by the team, there is now an intelligent notification layer.
You can adapt the report to your own logic and business context. The same pattern works for sales alerts, financial summaries, SLA reports, or any other recurring analysis.
Workflow architecture
The diagram below shows, in a compact way, how the workflow is structured. The sequence goes from the trigger, manual or scheduled, all the way to the final delivery in Teams.
This architecture keeps responsibilities clear: Power BI handles the analytical layer, Power Automate coordinates the sequence, Copilot Studio interprets the content, and Teams delivers the result.
I am using Power BI because I already have a Pro license, but the logic does not depend on it. You could adapt the same workflow to read
.xlsxor.csvfiles stored in SharePoint, for example.
What each step does
The workflow follows a linear sequence with 11 actions, 3 main connectors, and 1 agent in Copilot Studio. The table below shows what each step is responsible for.
| Power Automate step | Description |
|---|---|
| Trigger | Starts the workflow manually or on demand. |
| VarPeriod | Creates a variable with the current month/year format. |
| DAX Query | Runs an optimized DAX query directly against the Power BI semantic model. The returned data comes in JSON format. |
| Parse JSON | Structures the Power BI response so each field becomes easier to access. |
| Transformation | Filters and selects only the columns needed for the analysis. |
| CSV Table | The Power BI extraction starts as JSON. By converting it to CSV, I reduce the number of tokens sent to the agent. |
| Token | Estimates token volume before sending the payload to the agent, reducing the risk of exceeding the context window and causing processing errors. |
| Agent | Sends the consolidated data to Copilot Studio and waits for the agent response. |
| Response | Organizes the text returned by the agent. |
| Notification | Sends the analysis and insights directly to the user in Teams. |
Technical decisions
In this section, I explain the decisions that made the automation easier to maintain, reduced rework, and improved the usefulness of the final response.
Context window
Before thinking about the prompt itself, my first concern was more basic: how much data could I send without breaking the workflow? Anyone working with AI knows how much the context window matters. Once you start sending tables, instructions, business context, and still expect a structured response back, the risk of hitting the limit becomes real.
That is why I created a token estimation variable inside Power Automate. The goal was not precision. The goal was visibility into the payload size before the call happened. Without that, you can build a workflow that looks fine in a small test and fails exactly when the dataset gets larger.
According to the official Copilot Studio documentation, total context is the sum of everything involved in the request:
How the total is calculated
Total = Copilot Studio "computational cost" + agent instructions + user input data + history + expected output
In practice, that means you cannot look only at the message sent by Power Automate. There is also an invisible part of the total that consumes context, such as Copilot Studio orchestration prompts, topic descriptions, tools, and safety layers. That "computational cost" does not appear explicitly in the workflow, but it still counts toward the limit.
| Component | Estimated value | Notes |
|---|---|---|
| Copilot Studio "computational cost" | ~3K to 8K tokens | Includes orchestration, topic and tool descriptions, plus safety guardrails. |
| Agent instructions | Variable | This is the role and command you define for the agent. In this example, I configured it as a Supply Chain specialist. This content is set in Copilot Studio under Overview > Instructions. |
| Power Automate input | Variable | This is the content sent in the message field of the Execute Agent and wait action. In this case, it is a simple prompt telling the agent to analyze the file and return the answer in HTML. |
| History | 0 | In the Proactive API, the conversation starts empty when the conversationId is not reused. |
| Expected output | Variable | This is the response the model still needs to generate. |
Below is a real test example based on a data sample I sent while using GPT-5 Chat. This model has a 128K token context window:
~5,000 (computational cost)
+ 228 (instructions)
+ 7,905 (input)
+ 0 (history)
+ ~10,000 (estimated output)
= ~23,133 tokens (18% of 128K)
In other words, this scenario stays well within the limit. I am sharing this because I ran into the OpenAIModelTokenLimit error during earlier tests.
The most likely explanation is that the input was too large or that a smaller-context model was being used. Microsoft's own documentation makes this clear: each model has a maximum combined input size, including instructions, incoming data, and the response that still needs to be generated.
That changes the way you design the workflow. The question is not only whether the data fits. The real question is whether the data fits together with everything else the model also needs in order to answer.
In my case, the token variable became a practical safeguard. It helps me decide when to remove columns, summarize the content, change the payload format, or even reconsider the model selection before the error appears at runtime.
DAX directly inside the Power BI action
The workflow uses the Power BI query execution action, which allows you to send DAX directly to the dataset.
DAX query example
In the real workflow, the period is not hardcoded. The VarPeriod step builds that value and injects it into the query before execution. The example below shows the structure using SUMMARIZECOLUMNS and TREATAS.
DEFINE
    VAR FiltroPeriodo =
        TREATAS({"VarPeríodo"}, 'dim_calendario'[mes_ano])

EVALUATE
SUMMARIZECOLUMNS(
    'fato_basecompras'[GerenciaSupply],
    'fato_basecompras'[Fornecedor],
    FiltroPeriodo,
    "ValorBruto", [Spend]
)
How to connect the agent
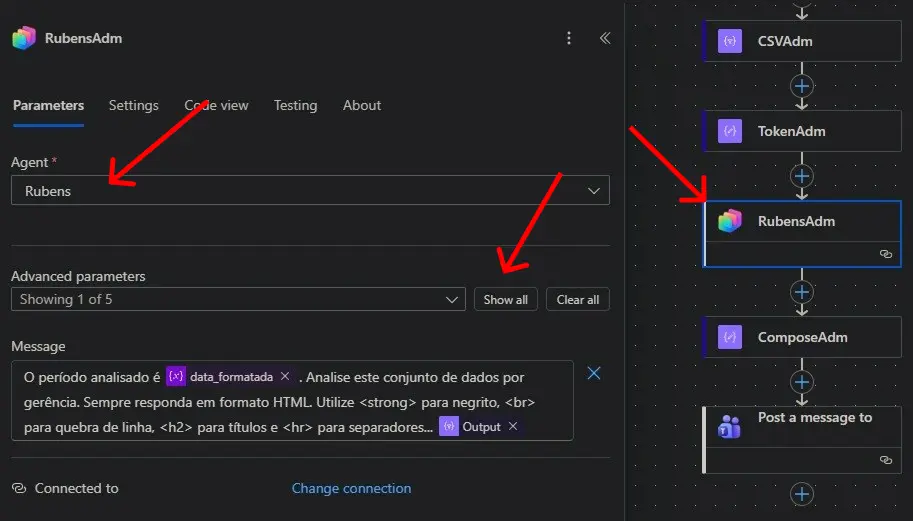
The agent call was built with the Microsoft Copilot Studio connector using the Agent and wait action.
How Agent and wait behaves
The workflow sends a message to the agent. The agent processes the received context. Power Automate waits until the response comes back. Once the answer is returned, the workflow continues normally.
This is also the point where I concentrated the core instruction of the workflow. To get a consistent response in Microsoft Teams, the safest approach is to ask for an output format that is predictable and easy to render. My prompt asks the agent to reply in simple HTML using tags such as <strong>, <br>, <h2>, and <hr>.
With that, Teams becomes more than a delivery channel. It also becomes an operational trail and confirmation point. The message arrives already formatted and ready to read, without requiring the recipient to open another system or dashboard. For recurring alerts, that makes a difference because the manager receives the analysis in the same place where daily communication already happens.
Why CSV instead of JSON
If you had to guess, which format would consume fewer tokens in an AI model: JSON or CSV?
Below, I compare the same simple dataset in JSON and CSV to show why this conversion makes sense inside the workflow.
JSON
[
  {
    "Fornecedor": "ABC",
    "Spend": 15000,
    "PMP": 45
  },
  {
    "Fornecedor": "XYZ",
    "Spend": 22000,
    "PMP": 60
  },
  {
    "Fornecedor": "DEF",
    "Spend": 8000,
    "PMP": 30
  }
]
Character count: 205 or 83 tokens (approximately)
CSV
Fornecedor,Spend,PMP
ABC,15000,45
XYZ,22000,60
DEF,8000,30
Character count: 58 or 26 tokens (approximately)
The difference looks small in this toy example, but it grows quickly as the table gets larger. In JSON, each row repeats field names such as "Fornecedor", "Spend", and "PMP", while also carrying quotes, braces, brackets, commas, and line breaks. In CSV, column names appear once and everything else is reduced to the raw data itself.
That is why I chose to work with CSV before sending the content to the agent. The objective was to reduce input volume and keep token estimation more efficient.
Cost-related decision
To track this inside Power Automate, I created a simple formula in a Compose step that estimates tokens based on character count.
I divide the number of characters by 2.5 to get a value that is closer to reality:
@{div(length(body('CSVAdm')), 2.5)}Because the content sent to the model is in pt-BR, I used the 2.5-characters-per-token factor. This estimate is more conservative, since languages such as Portuguese usually consume more tokens than English because of linguistic structure and accent usage.
If the content were in en-US, a common approximation would be 4 characters per token:
'@{div(length(body('CSVAdm')), 4)}'It is worth noting that this is still only an estimate, since the real token count varies depending on the content processed by the model.
If you want to validate it more precisely, OpenAI provides an official tokenizer here.
Documentation and references
Below is Microsoft's official Copilot Studio documentation, which helps you reproduce or expand this workflow with more confidence and better performance.
Conclusion: what to take from this
Every technical choice in this article was made to solve a practical problem. Below is a short checklist that you can use when building your own workflow:
Practical checklist
1. Validate the license before you start
Without an active Copilot subscription, none of the agent steps will work. Confirm this in the Microsoft portal before spending time on the build.
2. Estimate tokens before sending the payload
Create a Power Automate variable that divides total characters by 2.5 for pt-BR or 4 for en-US. This helps avoid the OpenAIModelTokenLimit error at runtime.
3. Prefer CSV over JSON
Converting to CSV can reduce token volume significantly. In the example from this article, the same sample dropped from about 83 to about 26 tokens.
4. Account for the invisible context cost
Copilot Studio may consume 3K to 8K tokens just for internal orchestration, guardrails, and topic descriptions. Add that to your input before deciding whether the request fits inside the context window.
5. Ask for simple HTML output
Tags such as <strong>, <br>, <h2>, and <hr> work well in Teams. Avoid Markdown or formats the connector may not render correctly.
6. Use the "Agent and wait" action
It ensures Power Automate pauses until the agent returns an answer, keeping the workflow synchronous and predictable.
7. Adapt the data source when needed
Power BI was used here for convenience because I already had a Pro license, but the same logic works with .xlsx or .csv files stored in SharePoint.
👇 Enjoyed this content?
If this article helped you, share it with someone else working with automation and data.
Take the opportunity to read more articles.